Dave's Place
Dometic AES Switch
RM663, RM763, RM1303
The AES switch is an on/off switch that is not just a simple on/off switch. In the "on" position it makes
several 12 volt connections through the seven wire ribbon to the circuit board, and it also makes a couple of
connections to the circuit board in the "off" position.
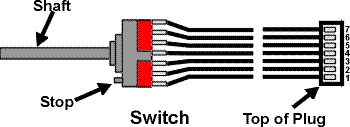
The switch, when out by itself, can rotate through several positions, but when installed properly can only move between two positions. If the switch rotates through more than two positions, then probably the mounting nut for the switch is loose. You can access the switch through the small panel in the front of the refrigerator that holds the thermostat and on/off knobs. You only need to remove the left hand screw on the panel to pull it out and gain access to the switch, as well as the thermostat. When tightening the mounting nut for the switch, be sure the plastic stop on the switch goes into the hole designed for it on the mounting bracket.
Troubleshooting
If you suspect a problem with the AES switch, it can be tested by accessing the modular plug, which is
plugged onto the circuit board. Access to the circuit board is at the rear, bottom of the refrigerator.
Disconnect the 12 volt and 120 volt power before working with the circuit board. Also, turn off the
propane since you'll have to remove the gas line to pull the circuit board.
With the plug disconnected from the circuit board and in the "on" position, you should have continuity between terminals 1 and 2, 4 and 5, 6 and 7. You'll need on ohm meter for this test. In the "off" position you should have continuity between terminals 2 and 3, 5 and 7. Also inspect the ribbon (wires) for cuts or shorts. If these test aren't successful, replace the switch.
RM3500, RM3600, RM3800
The switch (not shown) for these units is a slide switch mounted on a small circuit board in the eyebrow of
the refrigerator (at the top). Since this small eyebrow board also contains the light emitting indicator
diodes, the connection to the main circuit board is with a ten terminal plug (also not shown). You can
perform the same test as on the switch above (in the same order), but with the following continuities:
In the "on" position, you should have continuity between terminals 1 and 2, 3 and 4, 5 and 10. In the
"off" position, you should have continuity between terminals 1 and 3, 5 and 6.
There are more complex switches and eyebrow boards on later models, which are not covered here. Locating the wiring diagram for your model in the library might help.
RV Refrigerator Home
This RV refridgerator information was originally located on rvmobile.comRV Mobile Inc. 11715 HWY 99, Everett, WA 98204
The owner of RV Mobile Inc. apparently suffered a heart attack and the original website was shut down.
It has been reposted here to preserve this wealth of information RV refridgerator information.