Dave's Place
Rebuilding A Carter ThermoQuad Carburetor
For a solid 15-year run from 1971 until 1984, the Carter ThermoQuad (TQ) was ubiquitous on Mopar four-barrel V-8 engines. Really an evolution of the long line of Carter four-barrels, the TQ was a break in tradition, moving from the square-bore configuration of the earlier AFB and AVS carbs to a spread bore layout similar to the Rochester Quadrajet. The original OEM ThermoQuad, debuting on the 1971 340, was a unique unit with different castings, metering circuits, and tuning parts. These 1971 carbs are quite rare, and pretty much orphans today outside the world of authentic restorations. Subsequent carbs were produced in huge numbers, and saw only minor changes through rest of the production run. Though the TQ was an all-new carb, the distinguishing characteristics of earlier Carter four barrels were still there. This was an era where fuel efficiency and emissions were major considerations, and the highly-refined ThermoQuad carb, with its small primary barrels, dual booster venturi, and three-stage metering rods was perhaps the most advanced four-barrel carburetor on the market.
Configured with either 13/8 or 11/2-inch primaries and massive 21/4-inch secondaries, the TQ delivered enormous airflow. Wide-open, the "small" TQ was rated at 800 cfm, while the larger unit spec'd at 850 cfm, blowing away the airflow capacity of any previous OEM Mopar four-barrel. While the ThermoQuad certainly had the flow to support big power, the timing of events curbed its chance at glory as a high performance carb. Though originally employed by Mopar on the stout 1971 340 engine, most TQ carbs were on duty during the dark ages of Chrysler's emissions era. This period of declining horsepower, band-aid smog control systems, and compromised engine calibrations was not going to inspire any legends.
The signature feature of the ThermoQuad was its unique phenolic center body, providing an insulating effect to the fuel, significantly reducing fuel temperature (a 20-degree average reduction, according to Chrysler). Although the concept was sound, the "plastic" main body immediately raised the suspicions of old-time mechanics. As the years rolled on, the basic TQ was equipped with any number of combinations of add-on devices, including a crude throttle position sensor for the ESC system, idle stop solenoids, blow vent solenoids, vacuum-controlled auxiliary air bleeds, a high-altitude compensator device, and in the latest versions, a feedback primary metering solenoid. Given the generally terrible factory specs and drivability of those "smog" engines, and all of those extra gadgets on the carb, it was enough to turn most gear heads away from the mighty ThermoQuad. Even to this day, the ThermoQuad remains one of the most misunderstood and even feared carburetors ever produced.
While the OEM TQ received more than its fair share of disrespect, those in the know marveled at its engineering features, recognized its potential for efficiency, and embraced its tremendous airflow capacity. Nothing else off an OEM engine could deliver the wide-open airflow of a ThermoQuad. A well-tuned unit pulled atmosphere so forcibly it would rattle the fenders, and while ingesting air it delivered a bellowing moan that could be heard for blocks. Due to the TQ's huge production volume, along with a general lack of recognition in the performance world, a used ThermoQuad represents about the cheapest carb per cfm of airflow imaginable.
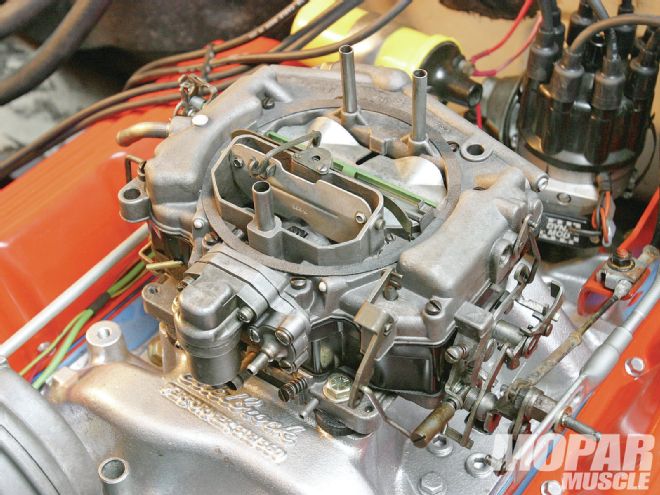
When considering a carb for the 326-cube small-block freshly built for our 1972 D-100 project, we wanted a low-buck unit that would maximize efficiency, and yet be able to support close to 400 horsepower. For this application, the ThermoQuad was the obvious choice. We had plenty of OEM cores on hand, though these carbs can still be readily found at rock-bottom prices at the boneyards and swap meets. We selected a Carter number 9004, an 850-cfm unit originally from a 1975 360 application. The plan was to give the carb a basic rebuild, and kits for these carburetors are still readily available. Although the ThermoQuad has a reputation for complexity, in reality the carb is fairly simple to rebuild. We'll go through what it takes to get an old TQ ready for service, pointing out some of the common mistakes and trouble spots.
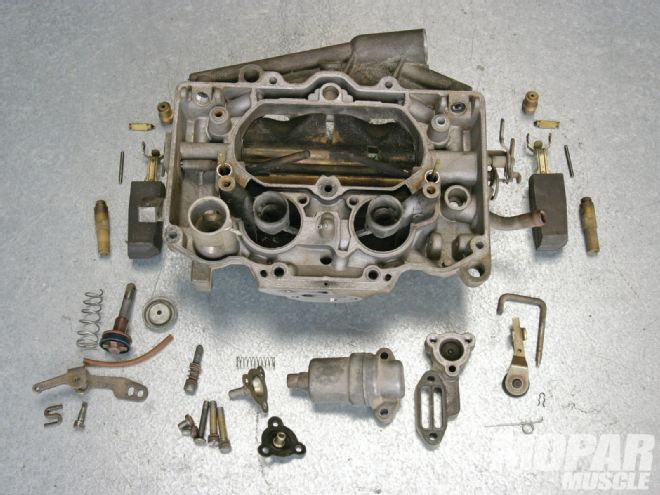
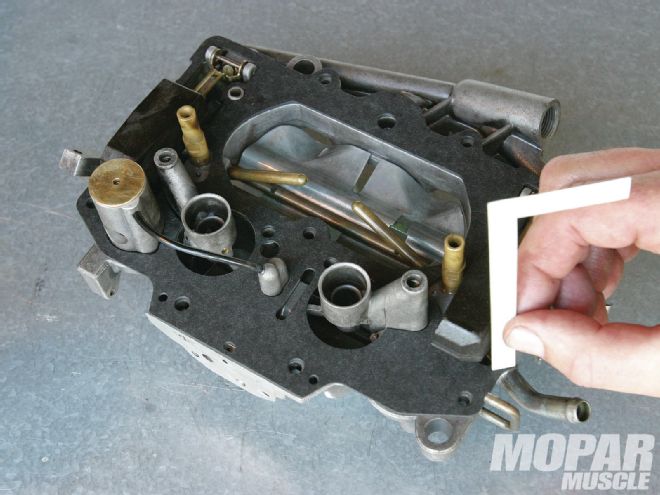
DisassemblySimilar to the earlier AFB and AVS, the ThermoQuad is configured in a stacked arrangement of main body, which contains the integral bowls, an upper airhorn assembly. Unlike its earlier brothers, the TQ features a separate lower throttle plate assembly. These three main assemblies are held together by ten bolts at the top of the carb. Disassembly begins with the removal of all of the linkages, the secondary/choke dashpot, and any ancillary devices or solenoids. We like to remove the metering rod assembly before separating the major castings. Once inside, it is clear that the majority of the components are incorporated into the airhorn assembly. Lift the corner of the gasket, and pull the float pins, floats, and needle and seats. Pull the plastic accelerator pump transfer tube, and then the body gasket can be removed. The secondary jets have flats on their sides and can be removed with a 5/16-inch wrench. The accelerator pump plunger is knocked out from the top after the "S" link is removed, driving the plate and check valve assembly out of the bottom of the pump well. In front of the choke plate, you'll find the accelerator pump discharge nozzles, with a check-needle beneath. |
The upper airhorn casting carries the majority of the internal parts, including the needle and seats, floats, accelerator pump system, and secondary jets. Our carb also had the purge vent, and high altitude compensator, both added as part of the emissions system of the day. |
|
The other two major castings have comparatively few parts. The main body contains the primary jets, a baffle plate in the secondary bores, and a pair of O-rings in the main wells. At the base plate, you'll find the metering rod step-up lever and pin, as well as the idle mixture and fast idle screws. Disassembly Mistakes and Trouble SpotsDisassembly of a TQ is really pretty straightforward, though damage usually happens when it is forced apart. A common error is forgetting about the two body fasteners behind the choke in the primary barrels. Sometimes, even when all the fasteners are loose, the gaskets can stick, keeping the carb from coming apart. Never pry a TQ apart, since the phenolic bowl will crack or break. Usually, a few light hammer taps around the aluminum airhorn will free it. The fast idle link from the choke countershaft lever down to the throttle linkage is best freed by bending back the top lever just enough to release the link. |
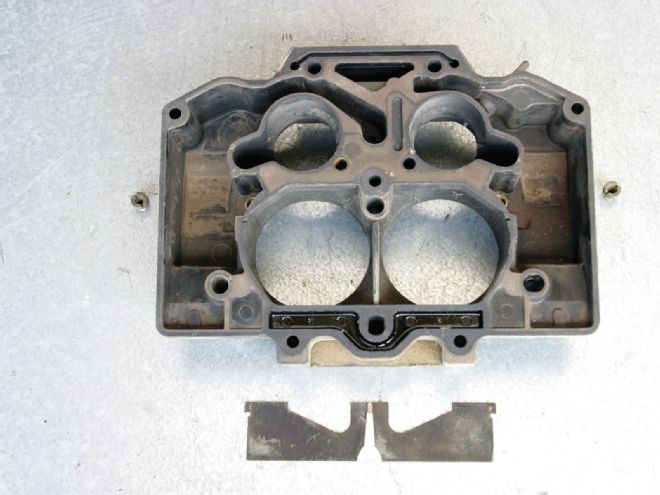
The TQ phenolic bowl is hated by some, but it actually helps keep the fuel cooler, which is a big benefit with todays fuels. Though these bowls seldom warp, they can crack or break. The only components found here are the primary jets and secondary air baffle. |
|
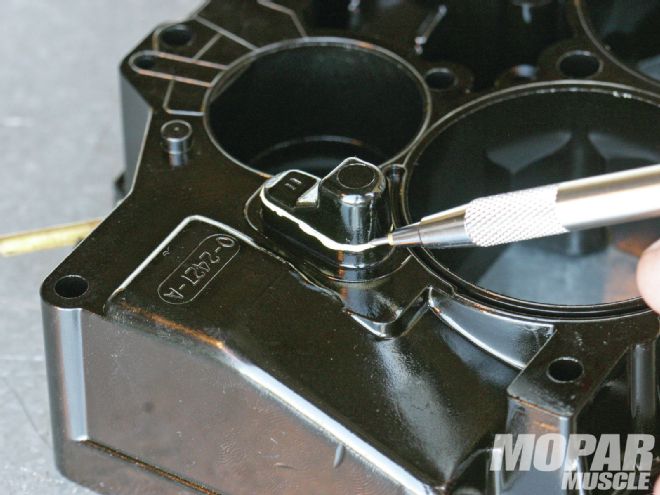
When removing the primary jets and inlet seats, use a correctly sized screwdriver with a slot wide enough to fully engage the part to avoid mangling the brass. The primary jets can sometimes be frozen in the body, and we have seen excessive force here rip the thread insert right out of the phenolic body, destroying it. Penetrating oil, or in extreme cases, an acidic solution can be applied to the backside of the jets via the main well transfer passages adjacent to the primary barrels. Carefully inspect the main body, especially for loose or leaking primary well buckets which are factory epoxied to the underside of the main body. Contrary to the popular myth, the main body is rarely warped, though it is subject to breakage and cracking, especially after becoming brittle over decades of use. |
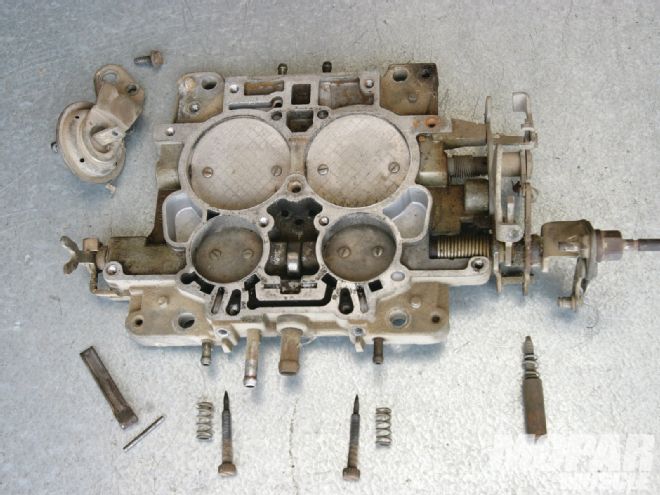
Note the huge proportion of the secondary versus the primary throttle butterflies. The base plate carries the adjustment screws, and a cam-operated step-up lever, which acts on the metering rods. The dashpot diaphragm works as the choke pull off, and also plays a role in secondary operation. |
CleaningOld fashioned carb cleaner soup was fortified with a heavy dose of methylene chloride, and would clean the filthiest carb spotlessly given a few hours of soaking. Unfortunately, newer formulas are not as effective, and the soup sold here in California is expensive and the results are usually disappointing. These days most effective alternative is ultrasonic cleaning, though these machines are out of reach of the casual hobbyist. For our ThermoQuad project we soaked the carb in a bucket of Simple Green cleaner, brushed and rinsed, and finished with aerosol solvent-type carb cleaner. Using the straw on cleaner spray can, we blew out all of the internal passages with solvent, making sure all of the passages were clear. Finally, the parts were blown clean and dry with compressed air. |
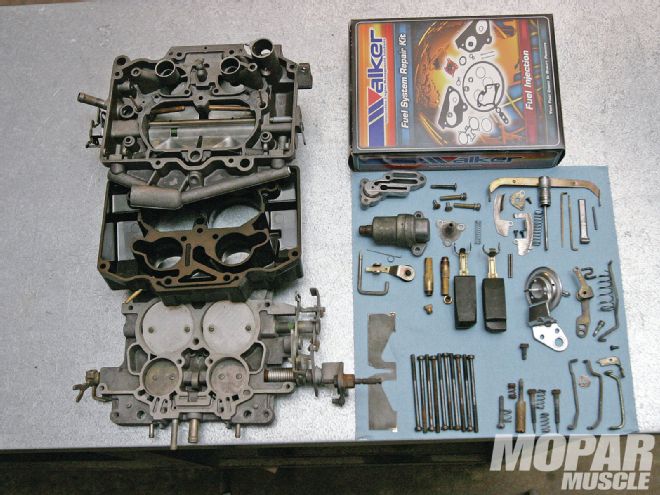
Out of frustration over todays expensive and less effective carb cleaner soups, we dropped our TQ parts into a mop bucket and soaked it with Simple Green instead. The parts were given a hot water rinse, and then a final cleaning with Gunk aerosol carb cleaner. It came out very clean. When its time to reassemble, we like to lay all of the parts out in an organized manner before beginning assembly. This helps reduce the chance of making a mistake or leaving something out. The carb kit contains everything wed need to freshen-up our ThermoQuad. |
AssemblyBefore beginning assembly, it pays to fully organize the carb components. We like to lay the parts out, grouping related components together. This will not only make the assembly process quicker, it will help avoid having to open the carb back up to install left over parts. ThermoQuad kits come with several extra gaskets, owing to the different primary size variations and a configuration change. Match the replacement gaskets to the originals, or carefully check the fit if the old gaskets are unavailable or destroyed. To avoid sticking gaskets and make future disassembly easier for tuning changes, saturate the gaskets in penetrating oil such as WD-40. Assembly is pretty much the reverse order of disassembly, loading the three major castings with their sub-components, and then stacking these together and bolting it up. Most of the work here is in the upper airhorn, starting with the accelerator pump components, then laying the gasket in place, replacing the pump transfer tube, installing the secondary jets, the needle and seats, then hanging and adjusting the floats. The main body gets the primary jets, secondary air baffle, and main well o-rings, while the base plate gets the adjustment screws and the metering rod step-up lever and pin. Stack the subassemblies together, and run the bolts in lightly seated at first, and then progressively tighten in an alternating pattern. Finish the external assembly with the accelerator pump discharge nozzles and check needle, metering rod assembly, dashpot, linkages, fuel inlet and any auxiliary devices. The carb kit provides detailed instructions on bench setting the various adjustments. |
We assembled the air horn first, starting with the accelerator pump to avoid jarring the floats while driving in the pump well cover. The gasket goes on before the floats, and dont forget to install the accelerator pump transfer tube. The only internal adjustment is the float level. |
Rebuilding PitfallsWhen cleaning the carb, be aware that some solutions will damage the carb. Acids are out, since they will almost instantly strip the delicate zinc plating from the steel parts, and many will oxidize and blacken the aluminum castings. Strong industrial "purple" parts cleaners will have the same negative effects as acids, so chose your potion carefully. Failed rebuilds usually come down to common mistakes. After installing the needle and seats, test by inverting the airhorn and blowing into the fuel inlet; the needle and seats should be sealed and closed, while air should flow freely with the airhorn upright. Make sure the square-cut rubber o-rings in the main wells are in position when the carb is assembled, as a compromised seal here will result in a severe rich condition. Always test the dashpot (choke pull off) diaphragm. This dashpot also controls the secondary opening via a controlled bleed-down orifice in the vacuum fitting, and is critical to the operation of the secondary. Install the metering rod yoke with the rods hanging in place, remembering to install the return spring first. Make sure the yoke is installed with the raised dimples to the choke tower side, or the metering rods will bind. If there is one aspect of the ThermoQuad that can be termed complex, it is in the linkages. There are over a dozen linkage adjustments, and though it may be tempting to just bang the linkages back on, these adjustments make all the difference between success and failure. Accelerator pump volume and timing, primary enrichment, Air Valve position and tension, and even the secondary opening itself relies on the linkages and the associated pawls and dogs are adjusted correctly. Go through and set everything to the specified specification before trying any "trick" settings. If your ThermoQuad stumbles, bogs, leans out, or runs pig rich, more often than not some aspect of the linkage is maladjusted. |
A key area to inspect is the underside of the phenolic bowl body. The buckets under the main wells were bonded in place when ThermoQuads were manufactured. Make sure the adhesive has not deteriorated and that the buckets are not leaking. |
Auxiliary EquipmentThe early ThermoQuads started out in very basic dress, with numerous add-ons coming into play later in production. The throttle stop solenoids or the TPS used on ESC cars are examples, though these devices are not a part of the metering function of the carb. Some later carbs came with a solenoid activated bowl vent, and if your carb is so equipped it has to be hooked up and functioning for the carb to fuel. This device can be defeated by removing the seal. |
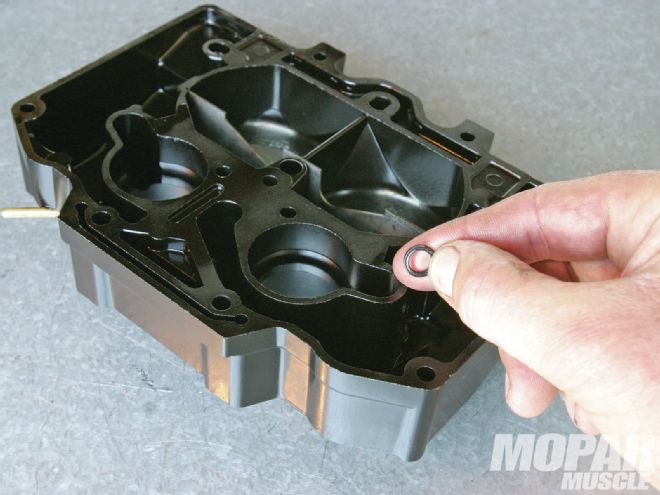
There arent many parts to install in the main body, just the primary jets, air baffle, and these critical o-rings for the main well. Make sure not to leave them out, and make sure they are not out of position when the carb is reassembled. |
|
Up front the later TQ's featured a flat-faced boss on the airhorn. Carbs of this configuration were revised with an auxiliary air bleed circuit that affects the fuel mixture. On some carb variations, this front boss was left un-machined and blank, defeating the additional air bleed circuit. Chrysler used three variations of controls on this air bleed provision, most commonly a vacuum operated diaphragm that closed the air bleed to enrich the mixture during warm up. Some carbs added a high altitude compensator valve to the enrichment diaphragm assembly. Our carb is so equipped. Finally, later OEM TQ's utilized a feedback solenoid here to electronically alter the metering via a primitive ECU feedback system. For the price of a 25-dollar core and a parts store carb kit, we had a healthy 850 CFM mixer perched atop our potent small block. While that might seem like a lot of carb, the TQ's unique metering and fuel delivery systems allow it to defy the normally accepted rules of carb sizing, even in much lower-powered OEM applications. With that level of flow on tap, we know the capacity is there to feed whatever our engine might demand. With the TQ's three-stage metering rods and small primary barrels featuring dual-booster venturi, we also know the TQ can be tuned to unrivaled carburetor efficiency. Best of all, we can look forward to laying those huge secondary butterflies on end, and hearing that signature ThermoQuad sound, with a throaty roar that leaves passersby asking, What the was that?" |
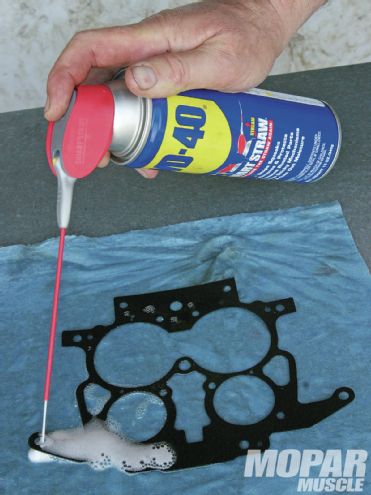
Chances are that we will be opening this carb again if we put the vehicle on a chassis dyno for super-tuning. Soaking the gaskets in penetrating oil keeps them from sticking and tearing if the carb is later opened for servicing or jet changes. |
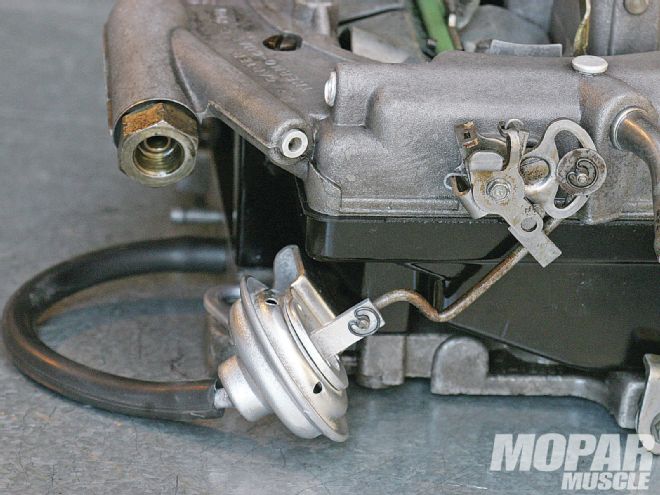
The air valve dashpot and its linkage adjustment is just as critical to the secondary operation of the TQ as the air valve spring tension. The diaphragm link acts as a stop on the air valve shaft, holding the air valve shut while there is vacuum applied to the diaphragm. Stab the throttle and manifold vacuum drops off almost instantly, but the diaphragm has an air metering orifice, controlling the rate at which the diaphragm bleeds down and lets go of the air valve. Make sure the dashpot isnt blown out, and take the time to adjust all the carbs external linkage to specs. |
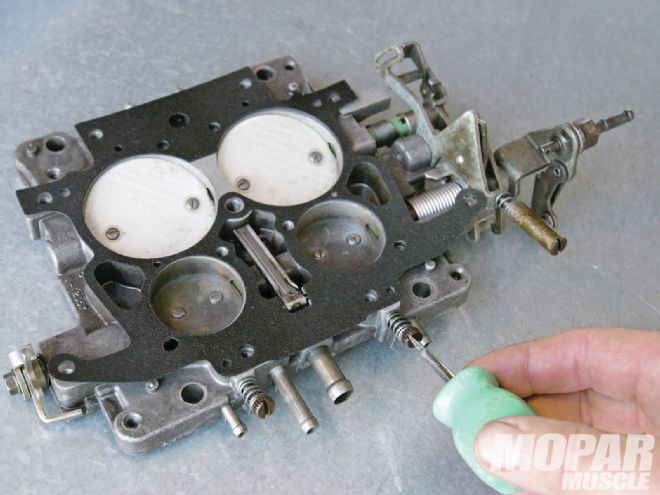
Remember to install the step-up lever and pin in the base plate, with the flat side down to the actuation cam. Set the idle mixture screws to 21/2 turns out from lightly seated. |
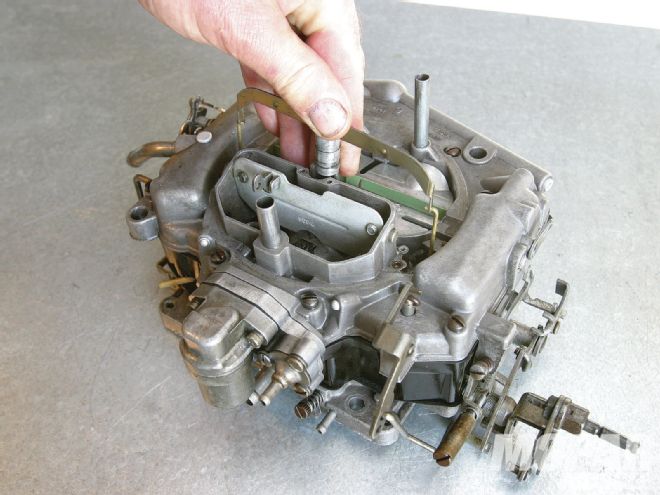
A nice feature of the TQ is the metering rod yoke arrangement, which ensures the rods are acting simultaneously. While depressing the yoke, adjust the step up rod to 11/2 turns up from fully bottomed. |
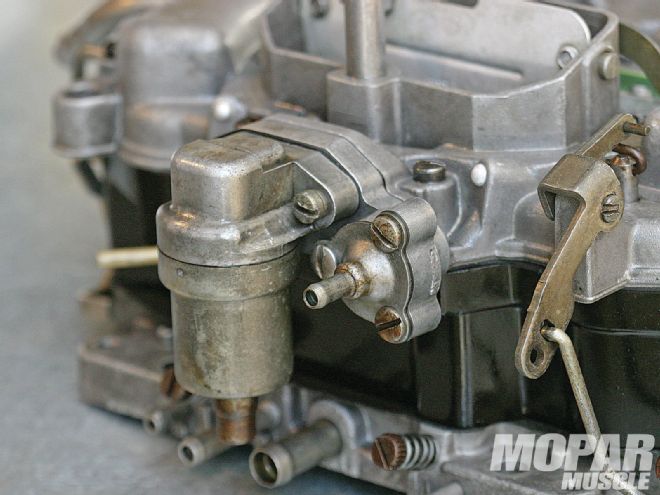
The idle enrichment valve opens the idle circuit to an extra air bleed, leaning the mixtureexcept when vacuum is applied during warm-up. It could more accurately be described as an enleanment valve. The barrel shaped device is the high altitude compensator. It senses air pressure with a gas filled bellow, opening and closing off an extra air bleed to adjust the main metering circuit. Though it was added as an emission device, the idea of altitude compensations sounds good enough to keep it. |